Getting Started
Welcome to Bundleza! This guide will help you get up and running
with our powerful Shopify app that enables you to create bundle
discount offers, upsell products, multi-upsell products, gift
products, banners, and custom sections for your store.
Prerequisites
Before installing Bundleza, ensure you have:
- An active Shopify store (any plan)
- Admin access to your Shopify dashboard
- At least one product with stock and variants in your store
Installation
Follow these steps to install Bundleza on your Shopify store:
Step 1: Log in to your Shopify admin dashboard
Log in to your Shopify admin dashboard at admin.shopify.com.
Step 2: Find and Install Bundleza
Search for Bundleza in the Shopify App Store:
- In the App Store search bar, type "Bundleza"
- Locate the Bundleza app in the search results
- Click on the Bundleza app card to view details
- Review the app description, features, and pricing
- Click Add app
Step 3: Grant Permissions
Review and approve the required permissions:
- Review the requested permissions carefully
- Click Install app to grant permissions
- Wait for the installation to complete
Quick Start Checklist
Tip
Start with creating one bundle and one upsell offer to test
the functionality. Once you're comfortable, expand to more
complex configurations.
Need Help?
If you encounter any issues during setup:
- Check our detailed documentation for each feature
- Contact our support team via the app dashboard
- Join our community forum for tips and best practices
- Watch our tutorial videos for visual guidance
You're now ready to start boosting your store's revenue with
Bundleza's powerful features!
How to Use Bundleza Blocks/Sections on Your Theme
Follow these common steps to add Bundleza sections (Bundle, Upsell, Multiple Upsell, Gift, Banner) to your
Shopify theme. This allows you to display your configured modules on product pages or other templates.
Step 1
Go to online theme customize
Step 2
Select default product page

Step 3
Select Block and selction here
Step 4
Final results
Banner on your shop

Blocks on your shop

Bundle Management
The Bundle Management page is your central hub for overseeing all your created bundles. Here, you can
edit, delete, duplicate, and update the status of your bundles to keep your store's offerings
organized and up-to-date.
Accessing Bundle Management
From the Bundleza dashboard, navigate to the Bundles section to access the Bundle Management page.
Bundle List and Actions
The bundle list displays all your created bundles with key information and available actions. You can
perform the following actions on each bundle:
- Edit: Modify the bundle's details, products, and settings.
- Delete: Permanently remove the bundle from your store.
- Duplicate: Create a copy of the bundle for quick setup of similar offers.
- Update Status: Toggle between Draft (hidden from customers) and Active (visible on
your store).
Important
To edit any bundle, you must first update its status to Draft.
Bundle Table
The bundle table displays all your created bundles with the
following information:
Tip
Use the status toggle to temporarily hide bundles during off-seasons or when updating offers, without
deleting them.
Important
To edit any bundle, you must first update its status to Draft.
Review Request
If you love Bundleza, please leave us a review in the
Shopify App Store!
Creating and Updating Bundles
Create a new bundle offer for your store or update existing bundles. This page allows you to configure all
aspects of your bundle, from basic details to advanced styling and product selection.
How to Create a New Bundle
- Enter Bundle Name: Provide a descriptive and appealing name for your bundle that will
attract customers.
- Select Selection Type: Choose how products are included in the bundle (All Products,
Specific Products, or Specific Collections).
- Configure Settings: Set up bundle settings, variant offers, and discount options to
create compelling pricing tiers.
- Customize Styles: Adjust colors, fonts, and layouts to match your store's branding.
- Select Products: Use the product selection modal to choose main products and variants
for the bundle.
- Set Up Variant Offers: Configure dynamic offers for different bundle variants.
7. Select custom image and free gift for each offer

To select free gift with budle, use the "free gift" to "select gift" button. This opens a modal
where
you can choose products and their variants.
Tip
Start with a simple bundle and test its performance before adding complex configurations. This allows
you to optimize based on customer feedback.
Bundle Name
Enter a descriptive and appealing name for your bundle. (Required)
Selection Type
Choose how products will be selected for the bundle. You can include all products, specific products, or
products from specific collections.
- All Products: Include any product from your store in the bundle.
- Specific Products: Manually select individual products.
- Specific Collections: Include all products from selected collections.
Settings
Configure the core settings for your bundle, including pricing, availability, and display options.
Bundle Settings
- ONLY TODAY: Enable a special "Only Today" promotion for the bundle.
- Variant Comparison Prices: Show comparison prices for different variants.
- Direct to Checkout: Allow customers to go directly to checkout from the bundle.
- Hide Variant Picker: Hide the variant selection options on the bundle page.
Bundle Variant Offers
Configure dynamic offers for bundle variants. Set quantities, discount types (e.g., Fixed Amount,
Percentage, Fixed Price), and discount values. Options can be default selected, and you can add multiple
new offers to create various pricing tiers.
- Quantity: Specify the number of items in the offer (fully customizable).
- Discount Type: Choose from Fixed Amount, Percentage, or Fixed Price.
- Discount Value: Set the discount amount or percentage (dynamic and adjustable).
- Default Selected: Mark an offer as pre-selected for customers. When preselected, the
offer will automatically be added to the cart when the customer clicks the Add to Cart or Buy It Now
button. If not selected, the customer needs to check the box to include it.
Tip
All quantities, discount types, and values are fully customizable. Experiment with different offers to
find what works best for your customers.
Styles
Customize the visual appearance of your bundle to match your store's theme. Adjust colors, fonts, layouts,
and other styling elements.
Title Styles
- Text Size: Set the font size for the bundle title (e.g., 18px).
- Font Weight: Choose font weight (Bold or Regular).
- Color: Select the color for the title text.
Sub-Title Styles
- Text Size: Set the font size for the sub-title (e.g., 16px).
- Font Weight: Choose font weight (Bold or Regular).
- Color: Select the color for the sub-title text.
Price Colors
- Color: Set the color for regular prices.
- Compare Price Color: Set the color for crossed-out compare prices.
Badge Colors
- Background: Background color for badges.
- Text: Text color for badges.
Label Colors
- Background: Background color for labels.
- Text: Text color for labels.
Gift Colors
- Background: Background color for gift elements.
- Text: Text color for gift elements.
Box Colors
- Border Color: Color for box borders.
- Box Color: Background color for boxes.
- Selected Box Color: Background color for selected boxes.
- Box Border Width: Width of box borders (e.g., 1px).
- Box Border Radius: Corner radius for boxes (e.g., 0px).
Image Settings
- Image Size: Set the size for product images (e.g., 2).
- Radius: Corner radius for images (e.g., 0px).
Gift Product - Image Settings
- Image Size: Set the size for gift product images (e.g., 2).
- Radius: Corner radius for gift images (e.g., 0px).
Additional Options
- ONLY TODAY: Enable special "Only Today" messaging.
- Most Popular: Mark the bundle as most popular.
- Single: Standard price for single purchases.
- Duo: Standard price for duo purchases.
- 🌐: Internationalization settings.
Internationalization settings allow you to translate the bundle text into one custom language or keep
it in default English.
Product Selection: Where to Show This Bundle
Use the product selection modal to choose products for your bundle. You can select main products or
specific variants.
- Main Product: Select the primary product for the bundle.
- Variants: Choose specific variants (e.g., size, color) for more precise control.
Variant Offers
Set up variant-specific offers within your bundle. This allows customers to choose different options for
products in the bundle.
- Variant Selection: Enable customers to select product variants in the bundle.
- Pricing Adjustments: Apply different discounts based on selected variants.
- Availability Rules: Set rules for which variants are available in the bundle.
Note
All style settings are dynamic and can be adjusted to fit your brand. Defaults are provided as
starting points, but everything is customizable for merchants.
Adding Bundle to Your Theme
To display your created bundles on your store's product pages, you need to add the Bundleza Bundle section
to your Shopify theme. This allows customers to see and interact with your bundle offers directly on
product pages.
Steps to Add Bundle Section
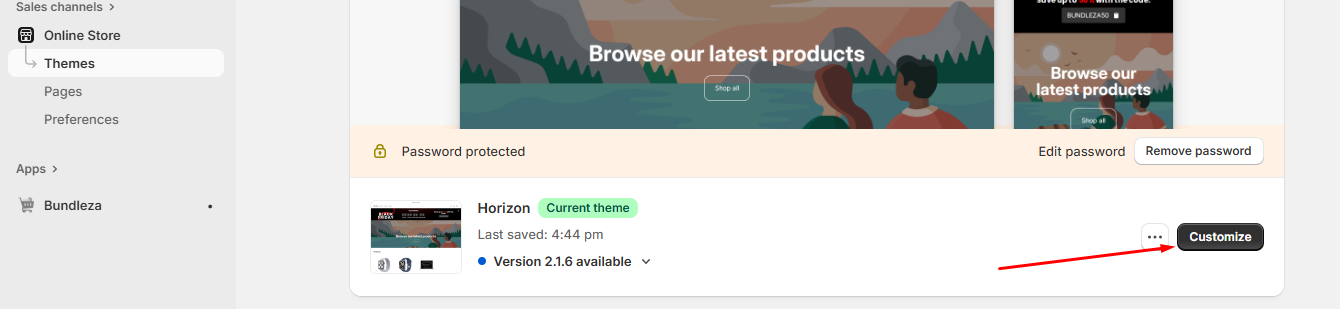
- Go to Online Store: From your Shopify admin, navigate to Online Store >
Themes.
- Customize Your Theme: Click on the Customize button next to your
live theme.
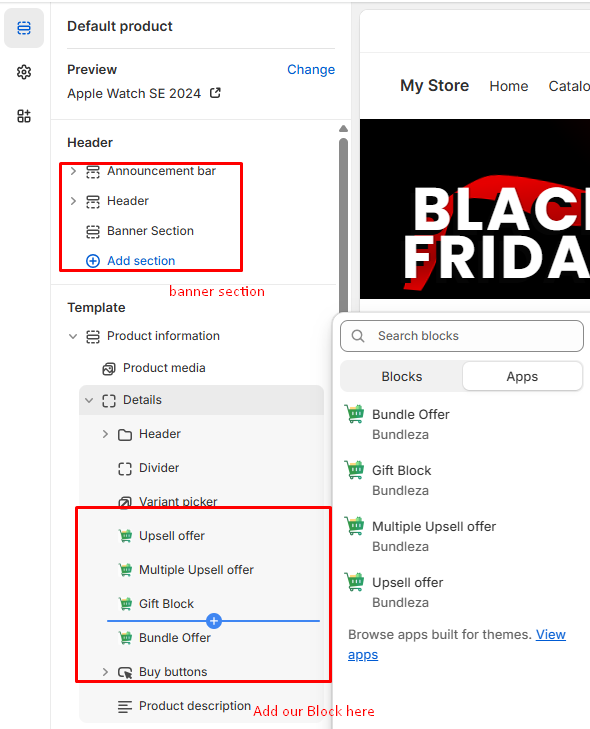
- Select a Product Page: In the theme editor, use the page selector at the top to
choose a product page template (e.g., Default product).
- Add Section: In the left sidebar, click Add section, then search for
and select Bundleza Bundle from the Apps section.
- Configure the Section: Once added, select the specific bundle you want to display
from the dropdown in the section settings.
- Save Changes: Click Save to apply the changes to your theme.
Tip
You can add the Bundleza Bundle section to multiple product templates or even collection pages for
broader visibility. Test the placement to ensure it complements your store's design.
Single Upsell Management
The Single Upsell Management page is your central hub for overseeing all your created single upsell
offers. Here, you can edit, delete, duplicate, and update the status of your upsells to keep your store's
offerings organized and up-to-date.
Accessing Single Upsell Management
From the Bundleza dashboard, navigate to the Upsells section to access the Single Upsell Management page.
Upsell List and Actions
The upsell list displays all your created single upsells with key information and available actions. You
can perform the following actions on each upsell:
- Edit: Modify the upsell's details, products, and settings.
- Delete: Permanently remove the upsell from your store.
- Duplicate: Create a copy of the upsell for quick setup of similar offers.
- Update Status: Toggle between Draft (hidden from customers) and Active (visible on
your store).
Important
To edit any upsell, you must first update its status to Draft.
Upsell Table
The upsell table displays all your created single upsells with the following information:
Tip
Use the status toggle to temporarily hide upsells during off-seasons or when updating offers, without
deleting them.
Review Request
If you love Bundleza, please leave us a review in the Shopify App Store!
Create Single Upsell
Create a new single upsell offer for your store or update existing upsells. This page allows you to
configure all aspects of your upsell, from basic details to advanced styling and product selection.
How to Create a New Single Upsell
- Enter Upsell Name: Provide a descriptive and appealing name for your upsell that will
attract customers.
- Set Visibility: Choose where the upsell should be displayed (e.g., on specific
products or collections).
- Select Product: Choose the product to be displayed as an upsell and configure its
details.
- Configure Settings: Set up pricing, discounts, and display options.
- Customize Styles: Adjust colors, fonts, and layouts to match your store's branding.
- Preview and Save: Review your upsell configuration and save it as Draft or Active.
Select varient or Products

To select products for your upsell, use the "Select varient/Products" button. This opens a modal
where
you can choose products and their variants. There is also a button to select all upsell variant products
for convenience.
Tip
Start with a simple upsell and test its performance before adding complex configurations. This allows
you to optimize based on customer feedback.
Upsell Name
Enter a descriptive and appealing name for your upsell. (Required)
Visibility
Choose where the upsell should be displayed. Options include all products, certain products, or certain
collections.
- All Products: Display the upsell on any product in your store.
- Certain Products: Select specific products for the upsell display.
- Certain Collections: Display the upsell on products from selected collections.
Product Selection: Where to Show This Upsell
Select the products or collections where the upsell will appear.
Settings
Configure the core settings for your upsell, including pricing and display options.
- Show Image: Enable or disable the product image display.
- Skip to Checkout: Allow direct checkout from the upsell.
- Strike Through Product Compare Price: Show crossed-out compare prices.
- Limited per Order: Set limits on upsell quantities per order.
Styles
Customize the visual appearance of your upsell to match your store's theme. Adjust colors, fonts, layouts,
and other styling elements.
Title Styles
- Text Size: Set the font size for the upsell title (e.g., 18px).
- Font Weight: Choose font weight (Bold or Regular).
- Color: Select the color for the title text.
Subtitle Styles
- Text Size: Set the font size for the subtitle (e.g., 16px).
- Font Weight: Choose font weight (Bold or Regular).
- Color: Select the color for the subtitle text.
Price Styles
- Color: Set the color for prices.
- Discount Name: Customize the discount label.
Badge Styles
- Background: Background color for badges.
- Text: Text color for badges.
Button Styles
- Background: Background color for buttons.
- Text: Text color for buttons.
Image Settings
- Show Image: Toggle image visibility.
- Alt Text: Set alternative text for images.
Select Product
Choose the product to be displayed as an upsell. Configure its name, subtitle, badge, price, and other
details.
- Upsell Name: e.g., Apple Watch Series 10
- Subtitle: e.g., Upsell
- Badge: e.g., Best Seller
- Price Text: e.g., $20000.00
- Discount Name: e.g., upsell discount
Multiple Upsell Management
The Multiple Upsell Management page is your central hub for overseeing all your created multiple upsell
offers. Here, you can edit, delete, duplicate, and update the status of your multiple upsells to keep your
store's offerings organized and up-to-date.
Accessing Multiple Upsell Management
From the Bundleza dashboard, navigate to the Upsells section to access the Multiple Upsell Management
page.
Upsell List and Actions
The upsell list displays all your created multiple upsells with key information and available actions. You
can perform the following actions on each upsell:
- Edit: Modify the upsell's details, products, and settings.
- Delete: Permanently remove the upsell from your store.
- Duplicate: Create a copy of the upsell for quick setup of similar offers.
- Update Status: Toggle between Draft (hidden from customers) and Active (visible on
your store).
Important
To edit any upsell, you must first update its status to Draft.
Upsell Table
The upsell table displays all your created multiple upsells with the following information:
Tip
Use the status toggle to temporarily hide upsells during off-seasons or when updating offers, without
deleting them.
Review Request
If you love Bundleza, please leave us a review in the Shopify App Store!
Create Multiple Upsell
Create a new multiple upsell offer for your store or update existing multiple upsells. This page allows
you to configure all aspects of your multiple upsell, from basic details to advanced styling and product
selection.
How to Create a New Multiple Upsell
- Enter Upsell Name: Provide a descriptive and appealing name for your upsell that will
attract customers.
- Select Multiple Upsell Style: Choose how your multiple upsells will be displayed
(Normal, Boxed, etc.).
- Configure Block Settings: Set up block title, footer text, and other display options.
- Set Visibility: Choose where the upsell should be displayed (e.g., on specific
products or collections).
- Select Products: Choose the products to be displayed as upsells and configure their
details.
- Customize Styles: Adjust colors, fonts, and layouts to match your store's branding.
- Preview and Save: Review your upsell configuration and save it as Draft or Active.
Select varient or Products

To select products for your multiple upsell, use the "Add Upsell Products" button. This opens a modal
where
you can choose products and their variants. There is also a button to select all upsell variant products
for convenience.
Tip
Start with a simple multiple upsell and test its performance before adding complex configurations.
This allows you to optimize based on customer feedback.
Upsell Name
Enter a descriptive and appealing name for your multiple upsell. This name will be displayed to customers
on your product pages.
Multiple Upsell Style
Select how your multiple upsells will be displayed. Options include Normal (layout1), Boxed (layout2),
Theme Button (layout3), Own Button (layout4).
Add to Cart Behavior
Choose whether to use the theme's Add to Cart button or your own custom button.
Block Settings
Configure settings for the block of upsells, including block title, footer text, and display options like
showing + icons between upsells.
- Block Title: e.g., Multiple Upsells
- Footer Text: e.g., Total:
- Show + icons between upsells: Enable to visually separate upsell items.
Visibility
Choose where the upsell should be displayed. Options include all products, certain products, or certain
collections.
- All Products: Display the upsell on any product in your store.
- Certain Products: Select specific products for the upsell display.
- Certain Collections: Display the upsell on products from selected collections.
Product Selection: Where to Show This Multiple Upsell
Choose where the upsell should be displayed. Options include all products, certain products, or certain
collections. You must select one of the following options: All Products, Certain Products, or Certain
Collections. This selection is required.
Skip to Checkout
Enable to allow direct checkout from the upsell.
Styles
Customize the visual appearance of your multiple upsell to match your store's theme. Adjust colors, fonts,
layouts, and other styling elements.
Block Title
- Text Size: Set the font size (e.g., 20px).
- Font Weight: Choose font weight (Bold or Thin).
- Text Align: Set alignment (Left).
- Color: Select the color for the title text.
Product Title
- Text Size: Set the font size (e.g., 20px).
- Font Weight: Choose font weight (Bold or Thin).
- Color: Select the color for the product title text.
Sub-Title
- Text Size: Set the font size (e.g., 14px).
- Font Weight: Choose font weight (Thin).
- Color: Select the color for the subtitle text.
Price
- Text Size: Set the font size (e.g., 14px).
- Font Weight: Choose font weight (Bold).
- Color: Select the color for prices.
Compare Price
- Text Size: Set the font size (e.g., 14px).
- Font Weight: Choose font weight (Thin).
- Color: Select the color for compare prices.
Badge Colors
- Background: Background color for badges.
- Text: Text color for badges.
Checkbox Colors
- Background: Background color for checkboxes.
- Checkmark Color: Color for checkmarks.
Box Colors
- Box Color: Background color for boxes.
- Box Border Color: Color for box borders.
- Box Hover Color: Background color on hover.
- Box Border Width: Width of borders (e.g., 1px).
- Box Border Radius: Corner radius (e.g., 0px).
Image Settings
- Image Size: Set the size for product images (e.g., 5).
- Radius: Corner radius for images (e.g., 0px).
Adding Upsell to Your Theme
To display your configured upsell offers on your store's product pages, you need to add the appropriate
Bundleza Upsell section to your Shopify theme. This enables upsell prompts to appear at strategic points
in the customer journey.
Steps to Add Upsell Section
- Go to Online Store: From your Shopify admin, navigate to Online Store >
Themes.
- Customize Your Theme: Click on the Customize button next to your
live theme.
- Select a Product Page: In the theme editor, use the page selector at the top to
choose a product page template.
- Add Section: In the left sidebar, click Add section, then search for
and select Bundleza Upsell (choose Single or Multi based on your upsell type) from the
Apps section.
- Configure the Section: Once added, select the specific upsell you want to display
from the dropdown in the section settings.
- Save Changes: Click Save to apply the changes to your theme.
Tip
Position the upsell section above the Add to Cart button for maximum effectiveness. You can add it to
cart pages or other templates as well for cross-selling opportunities.
Adding Multiple Upsell to Your Theme
To display your configured multiple upsell offers on your store's product pages, you need to add the
Bundleza Multiple Upsell section to your Shopify theme. This enables multiple upsell prompts to appear at
strategic points in the customer journey.
Steps to Add Multiple Upsell Section
- Go to Online Store: From your Shopify admin, navigate to Online Store >
Themes.
- Customize Your Theme: Click on the Customize button next to your
live theme.
- Select a Product Page: In the theme editor, use the page selector at the top to
choose a product page template.
- Add Section: In the left sidebar, click Add section (or Add
block), then search for
and select Bundleza Multiple Upsell from the Apps section.
- Configure the Section: Once added, select the specific multiple upsell you want to
display from the dropdown in the section settings.
- Save Changes: Click Save to apply the changes to your theme.
Tip
Position the multiple upsell section above the Add to Cart button for maximum effectiveness. You can
add it to cart pages or other templates as well for cross-selling opportunities.
Gift Management
The Gift Management page is your central hub for overseeing all your created gift modules. Here, you can
edit, delete, duplicate, and update the status of your gifts to keep your store's offerings
organized and up-to-date.
Accessing Gift Management
From the Bundleza dashboard, navigate to the Gifts section to access the Gift Management page.
Gift List and Actions
The gift list displays all your created gifts with key information and available actions. You can
perform the following actions on each gift:
- Edit: Modify the gift's details, products, and settings.
- Delete: Permanently remove the gift from your store.
- Duplicate: Create a copy of the gift for quick setup of similar offers.
- Update Status: Toggle between Draft (hidden from customers) and Active (visible on
your store).
Important
To edit any gift, you must first update its status to Draft.
Tip
Use the status toggle to temporarily hide gifts during off-seasons or when updating offers, without
deleting them.
Review Request
If you love Bundleza, please leave us a review in the Shopify App Store!
Creating and Updating Gifts
Create a new gift module for your store or update existing gifts. This page allows you to configure all
aspects of your gift, from basic details to advanced styling and product selection.
How to Create a New Gift
- Enter Gift Name: Provide a descriptive and appealing name for your gift that will
attract customers.
- Set Visibility: Choose where the gift should be displayed (e.g., on specific products
or collections).
- Select Products: Choose the product to be displayed as a gift and configure its
details.
- Configure Settings: Set up pricing, discounts, and display options.
- Customize Styles: Adjust colors, fonts, and layouts to match your store's branding.
- Preview and Save: Review your gift configuration and save it as Draft or Active.
Select varient or Products

To select products for your gift, use the "select varient Products" button. This opens a modal
where
you can choose products and their variants. There is also a button to select all gift variant products
for convenience.
Tip
Start with a simple gift and test its performance before adding complex configurations. This allows
you to optimize based on customer feedback.
Gift Name
Enter a descriptive and appealing name for your gift. (Required)
Visibility
Choose where the gift should be displayed. Options include all products, certain products, or certain
collections.
- All Products: Display the gift on any product in your store.
- Certain Products: Select specific products for the gift display.
- Certain Collections: Display the gift on products from selected collections.
Product Selection: Where to Show This Gift
Choose where the gift should be displayed. Options include all products, certain products, or certain
collections. You must select one of the following options: All Products, Certain Products, or Certain
Collections. This selection is required.
Settings
Configure the core settings for your gift, including pricing and display options.
- Show Image: Enable or disable the product image display.
- Skip to Checkout: Allow direct checkout from the gift.
- Strike Through Product Compare Price: Show crossed-out compare prices.
- Limited per Order: Set limits on gift quantities per order.
Styles
Customize the visual appearance of your gift to match your store's theme. Adjust colors, fonts, layouts,
and other styling elements.
Title Styles
- Text Size: Set the font size for the gift title (e.g., 18px).
- Font Weight: Choose font weight (Bold or Regular).
- Color: Select the color for the title text.
Subtitle Styles
- Text Size: Set the font size for the subtitle (e.g., 16px).
- Font Weight: Choose font weight (Bold or Regular).
- Color: Select the color for the subtitle text.
Price Styles
- Color: Set the color for prices.
- Discount Name: Customize the discount label.
Badge Styles
- Background: Background color for badges.
- Text: Text color for badges.
Button Styles
- Background: Background color for buttons.
- Text: Text color for buttons.
Image Settings
- Show Image: Toggle image visibility.
- Alt Text: Set alternative text for images.
Select Product
Choose the product to be displayed as a gift. Configure its name, subtitle, badge, price, and other
details.
- Gift Name: e.g., Apple Watch SE 2024
- Subtitle: e.g., 100% Natural
- Badge: e.g., best seller
- Price Text: e.g., $0
- Discount Name: e.g., gift discount
Gift Messages
Allow customers to add personalized gift messages to their
orders. Customize message fields, set character limits, and
control how gift messages appear on receipts and packing slips.
How to Set Up Gift Messages
- Navigate to the Gift Messages subsection in the Gift section.
- Enable gift messages for relevant products or orders.
- Set character limits and make fields required or optional.
- Customize how messages display on receipts and packing slips.
- Save the configuration.
Personalized gift messages add a thoughtful touch to purchases, making your store the preferred choice
for gifting and increasing customer loyalty.
Adding Gift to Your Theme
To display your configured gift modules on your store's product pages, you need to add the Bundleza Gift
section to your Shopify theme. This enables gift prompts to appear at strategic points in the customer
journey.
Steps to Add Gift Section
- Go to Online Store: From your Shopify admin, navigate to Online Store >
Themes.
- Customize Your Theme: Click on the Customize button next to your
live theme.
- Select a Product Page: In the theme editor, use the page selector at the top to
choose a product page template.
- Add Section: In the left sidebar, click Add section (or Add
block), then search for and select Bundleza Gift from the Apps section.
- Configure the Section: Once added, select the specific gift you want to display from
the dropdown in the section settings.
- Save Changes: Click Save to apply the changes to your theme.
Tip
Position the gift section above the Add to Cart button for maximum effectiveness. You can add it to
cart pages or other templates as well for gifting opportunities.
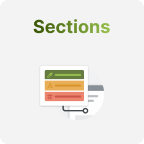
Select Theme
Choose a theme: Select your Shopify theme to
add sections to product pages.
Steps to Select a Theme
- Navigate to the Sections area in your Bundleza dashboard.
- From the available options, select your active Shopify theme.
- Confirm the selection to enable section additions for that theme.
Add Sections
After selecting your theme, click the "Add" button for the section you like to add. Alternatively, you
can watch a video tutorial for guidance.
How to Add Sections
- Review the list of pre-built sections available for your theme.
- Click the "Add" button next to the section you want to include (e.g., review boxes, benefit boxes).
- Configure the section's settings, such as content and styling.
- Save the changes and preview the section on your product page.
As a merchant, adding custom sections to your product pages allows you to highlight key benefits,
customer reviews, and bundle offers, directly influencing purchase decisions and improving conversion
rates.
Do you like our app?
We would appreciate a review! Help other merchants discover
Bundleza.
More Modules Coming Soon
Join our Discord community and connect with other shop owners to
get early access to new features.
Banner Management
Manage all your banners from the central dashboard. View, edit, and monitor banner performance to optimize
your promotional strategies.
Create Your First Banner Module
- Set your banner settings
- Customize Styles/Colors
- Save and add as a section
Banner List
The banner list displays all your created banners with key information and available actions. Search by
banner name to find specific banners quickly.
Important
To edit any banner, you must first update its status to Draft.
Review Request
Do you like our app? We would appreciate a review!
Create New Banner
Important
Before create banner you need to go section and select your theme and add this on your theme

Preview
The banner creation page includes a live preview feature that allows you to see how your banner will look
on desktop, mobile, and tablet devices. This helps you ensure the banner is optimized for all screen sizes
before saving.
Design and customize your banner with templates, themes, scheduling, and content options to create
engaging promotions that boost conversions.
Templates
Choose a pre-designed template for your banner to get started quickly.
Theme
Select from themes like Black Friday, Christmas, New Year 2025, Compact Mode, Valentine, and more to match
seasonal promotions. Each theme includes a preview to see how it will look.
- Black Friday: Preview of Black Friday theme
- Christmas: Preview of Christmas theme
- New Year 2025: Preview of New Year 2025 theme
- Compact Mode: Preview of Compact Mode theme
- Valentine: Preview of Valentine theme
Schedule
Set when your banner should be active with start and end dates/times. For example, start on 09/23/2025 at
09:00 AM and end on 09/23/2025 at 09:00 AM. Remember, the banner will start when the start time is
selected.
Language
Customize banner content for different languages to reach a global audience.
Banner Content
Design the texts for your banner here:
- Main Text: BLACK FRIDAY - Appears prominently on the left side of the banner.
- Call To Action: BUNDLEZA50 - The discount code that customers can use, e.g. SALE50.
- Countdown Label: Countdown - Text above the countdown timer.
- Discount Announcement: Save up to 50% with the code: - e.g. 'Save up to {{50%}} on
everything'.
- Close Button: Define the behavior after closing the banner.
- Display Interval: Define when the banner should reappear after being closed (Show
always).
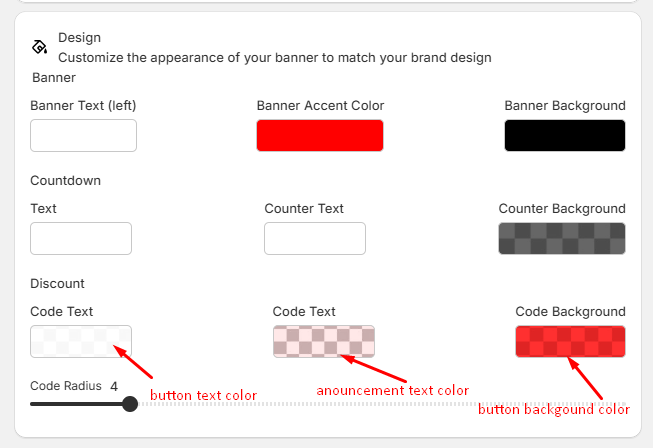
Design
Customize the appearance of your banner to match your brand design:
- Banner: Banner Text (left), Banner Accent Color, Banner Background.
- Countdown: Text, Counter Text, Counter Background.
- Discount: Code Text (for copy button of discount code), Announcement Code Text, Code
Background, Code Radius (e.g., 4).
Styles
Further customize the banner's styles, including colors. These settings allow for precise control over the
visual elements to
create a cohesive and professional look.
- Text Colors: Adjust the color of main text, countdown timer, and discount code text
to match your brand palette. For example, use your primary brand color for headings and a contrasting
color for secondary text.
- Background Colors: Set custom backgrounds for the banner, countdown section, and
discount code area. Choose solid colors, gradients, or even transparent backgrounds to fit your design
theme.
- Border Radius: Set the corner radius for elements like the discount code box or
buttons. A higher radius creates rounded corners for a modern look, while 0px gives sharp edges for a
classic style.
Success
Banner will be active from 2025-09-23 at 09:00 until 2025-09-23 at 09:00
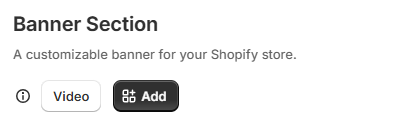
Adding Banner to Your Theme
To display your configured banners on your store's pages, you need to add the Bundleza Banner section to
your Shopify theme. This enables banner displays on product pages, home page, or other templates.
Steps to Add Banner Section
- Go to Online Store: From your Shopify admin, navigate to Online Store >
Themes.
- Customize Your Theme: Click on the Customize button next to your
live theme.
- Select a Template or Section: In the theme editor, use the page selector at the top
to choose the page template (e.g., Home page, Product page) or select the Header from the left sidebar
to add the banner to the site header.
- Add Section: In the left sidebar, click Add section (or Add
block), then search for and select Bundleza Banner from the Apps section.
- Configure the Section: Once added, select the specific banner you want to display
from the dropdown in the section settings.
- Save Changes: Click Save to apply the changes to your theme.
Tip
Banners can be added to various pages like home page for promotions, product pages for special offers,
or collection pages for category-specific banners, or to the header for site-wide visibility.